This chapter describes how to use your PayPal account profile settings to control how Website Payments Standard works for people who pay you and how it works to let you accept the payments that they make.
The My Account Overview page appears.
The Profile Summary page appears.
Use the Account Information column for basic account maintenance, including updating your password, adding and confirming email addresses, managing your business information, and for business accounts, configuring PayPal account for multi-user.
Use the Financial Information column to organize and maintain the financial instruments associated with your PayPal account, including managing your credit cards and bank accounts, activating and managing your PayPal Debit Card, managing multiple currency balances, and viewing monthly account statements.
Use the Selling Preferences column to configure the way you collect payments with PayPal, including:
Many of the selling preferences that you can set in your account profile have equivalent HTML variables that let you control the behavior of individual transactions. After you enable settings in your account profile, you can include HTML variables with a transaction that take advantage of those settings.
Custom payment pages let you tailor the PayPal payment pages presented to payers to match the style of your website. Custom payment pages work with all Website Payments Standard buttons and with the PayPal Account Optional account profile setting turned on or off.
Figure 2.3 , “Custom Page Style with All Branding Options,” shows all the options that you can specify for your own, custom payment page styles.
The My Account Overview page appears.
The Profile Summary page appears.
|
3.
|
In the Selling Preferences column, click the Custom Payment Pages link.
|
The Custom Payment Page Styles page appears, as shown below.
|
3.
|
Click the Preview button to view a mock-up of your page style, or click the Save button to save it.
|
The Make Custom Page Style Primary page appears.
|
4.
|
Click the Make Primary button to confirm your choice.
|
Your primary page style is applied to all payment pages unless you specify otherwise. You can override this behavior by specifying custom page style variables on individual transactions.
To change the page style for a button you already created, replace the value of the page_style variable with the page style name you want to use. The next time that someone clicks the button, the subsequent payment pages appear in the new style.
When you specify custom payment page variables on individual transactions, the page variables override page styles set in your account profile or the
page_style variable. The custom payment page variables take precedence in the following order:
|
|
|
|
|
|
Custom Payment Page Variables on Individual Transactions
|
|
|
|
Primary Page Style on Individual Transactions
|
With the page_style variable, you can specify a page style on individual transactions that overrides any page styles set in your account profile.
|
|
|
|
|
|
|
|
|
With PayPal Account Optional turned on, people who are not currently PayPal members can pay by credit card without first signing up for a PayPal account. After making the payment, payers can sign up with PayPal using the address and credit card that was used for the completed transaction.
Figure 2.5 , “Page Sequence with PayPal Account Optional” illustrates the sequence of pages that people experience when they pay by credit card without first signing up with PayPal.
Step 1: Bob goes to the DesignerFotos website, makes his selections, and clicks the
Add to Cart button.
Step 2: Since Bob is new to PayPal, he is taken to a billing information page. If he had a PayPal account, he could log in here to access his saved information. He is not a PayPal member, so he enters in his information and clicks the
Review Payment button.
Step 3: Bob is taken to a review page. He clicks the
Pay $505.00 Now! button to complete his purchase.
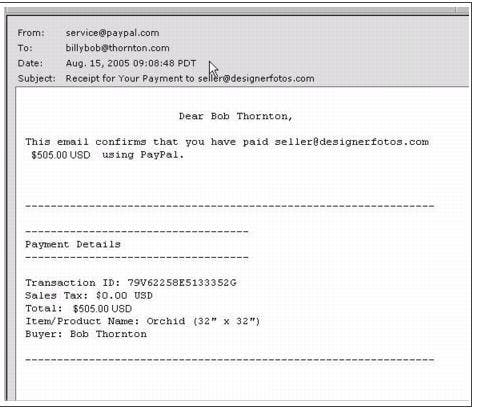
Step 4: Bob is taken to a payment completion page and will receive an email receipt.
Because Bob is not a PayPal member, he can choose to sign up for a PayPal account on this page by entering his email address, selecting a password, and clicking the
Create Account button.
Step 5: Bob sees a page that confirms the creation of his account.
If he clicks the Return to Merchant button, his browser is redirected back to the merchant’s website.
Step 6: Bob receives an email receipt that confirms his payment and includes a copy of the payment details for this transaction.
The My Account Overview page appears.
The Profile Summary page appears.
|
3.
|
Click the Website Payment Preferences link in the Selling Preferences column.
|
The Website Payment Preferences page appears.
|
5.
|
Select the Off radio button to turn PayPal Account optional off.
|
With Auto Return for Website Payments, you can avoid making your payers click an extra button before returning to your website after they complete their payments. Auto Return applies to all Website Payments, including Buy Now, Shopping Cart, Subscription, Gift Certificate, and Donation buttons.
With Auto Return on, instead of having to click a button on the payment receipt page (identified in
Figure 1.1 with a circled “3” and shown in
Figure 1.6 ), payers see an alternative payment confirmation page for a few seconds before their browsers redirect them automatically to your website.
The My Account Overview page appears.
The Profile Summary page appears.
|
3.
|
Under the Selling Preferences column, click the Website Payment Preferences link.
|
The Website Payment Preferences page appears, as shown below.
|
4.
|
Under Auto Return for Website Payments, click the On radio button to enable Auto Return.
|
|
5.
|
In the Return URL field, enter the URL to which you want your payers redirected after they complete their payments.
|
With Auto Return turned on in your account profile, you can set the value of the return HTML variable on individual transactions, which overrides the value of the return UL that you stored on PayPal as part of the Auto Return feature. For example, you might want to redirect payers to a URL on your site that is specific to that person, perhaps with a session-id or other transaction-related data included in the URL.
If you use or plan to use Subscriptions Password Management, you must make sure that Auto Return is turned off in order to display the PayPal-generated username and password to the subscriber.
“Contact Information Telephone” is an option that lets you collect a contact telephone number for from people who pay you. When you activate this option, payers are prompted to include a contact telephone number with their payment information.
You can make the contact telephone number optional or required, or you can turn it off. “Off” is the recommended default option because people value their privacy and prefer to minimize unsolicited communications.
The My Account Overview page appears.
The Profile Summary page appears.
|
3.
|
In the Selling Preferences column, click the Website Payment Preferences link.
|
You can set up your PayPal account to automatically calculate and charge sales tax (also called value-added tax or VAT). You can create sales tax rates for domestic (U.S.-only) and international buyers as follows:
|
2.
|
Click the Profile subtab of the My Account tab.
|
|
3.
|
In the Selling Preferences column, click the Sales Tax link.
|
|
1.
|
Click State for Configure Sales Tax by.
|
|
6.
|
Click the Create Another button to add the new rate and then add another domestic sales tax rate.
|
|
1.
|
Click Zip Code for Configure Sales Tax by.
|
|
6.
|
Click the Continue button to add the new rate and return to the Sales Tax page.
|
|
7.
|
Click the Create Another button to add the new rate and then add another domestic sales tax rate.
|
|
1.
|
Click Zip Code for Configure Sales Tax by.
|
|
6.
|
Click the Continue button to add the new rate and return to the Sales Tax page.
|
|
7.
|
Click the Create Another button to add the new rate and then add another domestic sales tax rate.
|
To add a new rate, click Add New Sales Tax in the
Set Up International Tax Rates box.
|
2.
|
If you selected Canada for Country, select one or more provinces or select All Provinces. Hold down the Ctrl key to select more than one province.
|
|
6.
|
Click the Create Another button to add the new rate and then add another international sales tax rate.
|
When multiple rates apply, the most specific rate is used. For a buyer in zip code 94044, the most specific rate is the single zip code rate of 8.25%. For a buyer in zip code 94056, the most specific rate is the range of zip codes with a rate of 7.75%.
You can set up your PayPal account to calculate shipping charges automatically. Shipping charges are calculated based on the shipping rates you specify in the
Selling Preferences of your account profile. You can set up different shipping rates for U.S. domestic and international shipments, different rates for different domestic and international shipping regions, and different rates for different levels of shipping service.
Your organize your shipping rates primarily by the states and countries to which you ship your products. Some merchants make only domestic shipments. Other merchants make both domestic shipments and international shipments. Depending on territorial size, some merchants divide their domestic markets into smaller shipping regions, each with their own shipping rates.
You can establish one set of shipping rates for all domestic and international destinations, but your shipping rates should reflect your costs of shipping, which generally vary between different domestic and international regions.
Within each shipping region that you define, you specify specific shipping rates for the different
shipping methods you want to offer buyers. A shipping method specifies a mode of shipment and the general time frame for delivery. For example, you might offer your domestic buyers two shipping methods: “Standard Shipping” and “Priority.”
For each region in which you offer a specified shipping method, you generally select different delivery time frames and different rates. Otherwise, you should not set up separate shipping regions.
For example, your “Standard Shipping” method for the region where your shipments originate might specify a time frame of “2-3 Days.” A more distant domestic shipping region might specify a time frame of “3-7 Days.” You set the same rates for “Standard Shipping” in all regions, but delivery times are longer for more distant ones.
As an alternative to differentiating on delivery time, you might differentiate on rates. For example, your “Standard Shipping” method for all domestic regions might specify the same time frame of “2-3 Days.” You set more expensive rates for “Standard Shipping” in more distant regions, but delivery times are the same for all regions.
For each shipping method in each shipping region that you define, you specify the basis upon which your shipping rates are used to calculate the shipping charges for specific purchases. You can choose from the following shipping rate bases:
Generally, you specify the same shipping rate basis for all shipping regions and shipping methods that you define. Before you begin setting up the shipping rates that PayPal uses to calculate shipping charges, decide which basis is most suitable for the kinds of products you sell and the typical orders that your buyers place.
For each shipping method you define, fill in a rate table to specify the rates that PayPal uses to calculate shipping charges. Rate tables let you specify
tiered rates.
Each row in a rate table represents a different tier. Each successive tier encompasses a successively increasing range within the rate basis. You specify a separate rate for each tier.
In the preceding example rate table, each successive tier encompasses an increasing range of order amounts. The first tier encompasses orders that total from $0.01 USD through and including $10.00 USD. The shipping rate for orders that fall within the first tier is 5% of the total order amount. The shipping charge for an order amount of $6.75 USD is $0.34 USD.
When you set up shipping methods, specify the same currency for the shipping rates that you used to price the products on your website. Specify shipping rates for both domestic shipments and international shipments in your domestic currency, provided that you priced your products for international buyers in your domestic currency.
If you price your products in multiple currencies, you should specify international shipping rates in the same currencies that you priced your products for international buyers. For example, a merchant in London might price products in Pounds Sterling for British buyers, while also pricing the same products in Euros for Euro-zone buyers and U.S. Dollars for U.S. buyers.
The My Account Overview page appears.
The Profile Summary page appears.
|
3.
|
In the Selling Preferences column, click the Set Up Shipping Calculations link.
|
This Shipping Calculations page appears, as shown below.
From the Shipping Calculations setup page, you can start a domestic or an international shipping wizard.
Whenever you add a shipping method, you use one of two wizards to step you through the process. The domestic shipping wizard lets you configure shipping regions within the U.S., and the international shipping wizard lets configure foreign shipping regions. Shipping wizards let you configure a shipping region and all the shipping methods for it at one time.
|
l
|
Click the Start button from the Shipping Calculations setup page, as shown in Figure 2.12 , “Shipping Calculations Setup Page.
|
|
l
|
Click the Add Another Shipping Method link from the Shipping Calculations review page, as shown in Figure 2.14 , “Shipping Calculations Review Page (U.S. Merchants Only).
|
The first step of a shipping wizard lets you select the U.S. states or foreign countries for one or your shipping regions. In addition, you select the currency in which you want to price the shipping rates within the region.
As the second step of a shipping wizard, you configure the shipping methods that you want for the shipping region. A shipping wizard lets you configure the name, delivery time frame, rate basis, and rate table of shipping methods.
Repeat the second step of a shipping wizard to create additional shipping methods for the same shipping region. Click the
Create Another button after completing the configuration of the current method to begin the configuration of the next one.
After you configure all the shipping methods for the shipping region, click the Continue button to proceed to the third and final step of the shipping wizard.
As the final step of a shipping wizard, you review the configuration of the shipping region and the configuration of the shipping methods for the shipping region. You can change the shipping region, and you can change and add shipping methods.
In addition, the final step of a shipping wizard lets you enable individual purchase transactions to override the rates for the shipping methods you defined within the shipping region. Select the
Override profile shipping method... checkbox to permit individual transactions to override automatic calculation of shipping charges. For more information, see
“Overriding Shipping Calculations on Individual Transactions”.
After you review the shipping region and its shipping methods, click the Save Shipping Methods button to preserve the shipping methods that you set up with the shipping wizard. The shipping methods become available to buyers as soon as you save them.
After you set up some shipping regions, methods, and rates, the page sequence is tailored for viewing and editing existing shipping methods, as well as for creating additional regions, methods, and rates.
The Profile Summary page appears.
|
3.
|
In the Selling Preferences column, click the Shipping Calculations link.
|
The Shipping Calculations review page appears, as shown below.
|
4.
|
From the Shipping Calculations review page, perform one of the following actions:
|
|
1.
|
From the Shipping Calculations review page, select the checkbox next to the shipping method you want to view.
|
The View Domestic Shipping Method page or the
View International Shipping Method page appears.
|
1.
|
From the Shipping Calculations review page, select the checkbox next to the shipping method you want to change.
|
The Edit Domestic Shipping Method page or the
Edit International Shipping Method page appears.
You can delete one or more domestic or international shipping methods at one time. Follow the procedure below in either the
Domestic Shipping Methods section or the
International Shipping Methods section of the
Shipping Calculations review page.
|
1.
|
From the Shipping Calculations review page, select the checkboxes next to the shipping methods that you want to delete.
|
|
3.
|
Click the Yes button in the Delete Confirmation message box.
|
When you choose Total Order Amount or
By Amount as the basis for shipping rates, tiers in the rate table represent increasing ranges of order amounts. Generally, you select
By Amount as the rate basis if you want to encourage your buyers to buy more with increasing discounts on shipping charges.
You can choose between specifying a flat rate for each tier or specifying a percentage of the order amount. Click the
Flat Rate or the
Percent links in the
Shipping Rate section to make your choice.
The shipping charge for an order amount of õ36.50 EUR is õ3.00 EUR. The shipping charge for an order amount of õ66.50 EUR is õ2.00 EUR This rate structure encourages buyers to purchase more with discounted shipping on larger orders.
The shipping charge for an order amount of ¥36.50 JYP is ¥1.38 JYP (36.50 x 5%). The shipping charge for an order amount of ¥66.50 JYP is ¥2.66 JYP (66.50 x 4%).
When you choose Total Order Weight or
By Weight as the basis for shipping rates, tiers in the rate table represent increasing ranges of order weights. Generally, you select
By Weight as the rate basis if you want to recover your shipping costs.
The shipping charge for an order that weights 36.50 kg is £3.00 GBP. The shipping charge for an order that weights 66.50 kg is £6.00 GBP.
When you choose Total Order Quantity or
By Quantity as the basis for shipping rates, tiers in the rate table represent increasing ranges of order item counts. Generally, select
By Quantity as the rate basis if all your products have a generally uniform size and weight, such as shoes.
Sometimes you want to set special shipping rates for certain items, such as especially heavy ones that cost more to ship, or services and digital downloads that do not require shipping.
|
1.
|
From the Shipping Calculations review page, select the checkbox next to any of the shipping methods for a specific currency.
|
The Edit Domestic Shipping Method or the
Edit International Shipping Method page appears.
|
3.
|
For the Override shipping methods per transaction.setting, select one of the following radio buttons:
|
|
–
|
Yes: enables transaction-specific shipping charges to override the shipping rates
|
|
–
|
No: prohibits transaction-specific shipping charges
|
|
IMPORTANT:
|
Changing the Override shipping methods per transaction.setting of a specific shipping method changes the setting for all U.S. domestic and international shipping methods that use the same currency.
|
The My Account Overview page appears.
The Profile Summary page appears.
|
3.
|
In the Selling Preferences column, click the Shipping Calculations link.
|
The Shipping Calculations page appears, as shown below.
When you choose Flat Amount as the cost method for shipping rates, costs for each price range are expressed as fixed amounts.
õ3,00 EUR õ0,00 EUR - õ49,99 EUR
õ6,00 EUR õ50,00 EUR - and up
The shipping charge for an order price of õ36,50 is õ3,00. The shipping charge for an order price of õ66,50 is õ6,00. This rate structure helps you recover your shipping costs from buyers.
When you choose Percentage as the cost method for shipping rates, costs for each price range are expressed as percentages of the actual order price.
The shipping charge for an order price of £36.50 is £1.83. The shipping charge for an order price of £66.50 is £2.66. This rate structure encourages buyers to purchase more with discounted shipping rates on larger orders
Sometimes you want to set special shipping rates for certain items, such as especially heavy ones that cost more to ship, or services and digital downloads that do not require shipping.
The Profile Summary page appears.
|
3.
|
In the Selling Preferences column, click the Shipping Calculations link.
|
The Shipping Calculations page appears
|
4.
|
Click the checkbox labelled Click here to allow transaction-based shipping values to override the profile shipping settings listed above (if profile settings are enabled).
|
The My Account Overview page appears.
The Profile Summary page appears.
|
3.
|
In the Selling Preferences column, click the Payment Receiving Preferences link.
|
The Payment Receiving Preferences page appears, as shown below.
You can better manage your risk by blocking payments where the payer chooses not to share his Confirmed Address with you. PayPal provides Confirmed Addresses to help you make informed decisions when shipping goods. To be eligible for PayPal's Seller Protection Policy (SPP), and to help reduce your risk of dealing with fraudulent buyers, ship to a buyer’s Confirmed Address.
|
l
|
Yes: All payments from U.S. payers without a Confirmed Address are blocked. All U.S. payers must provide a Confirmed Address in order to pay you.
|
|
l
|
No: All payments are accepted. To maximize your sales, select No.
|
|
l
|
Ask Me: You can choose whether to accept or deny payment without a Confirmed Address on a case-by-case basis. This option lets decide whether to take on the risk of not having the payer’s Confirmed Address for each transaction. If you accept the payment, it becomes a completed transaction. If you deny a particular payment, the sender of the payment is notified that the payment has been denied and is credited with the payment amount. PayPal does not charge fees for denied payments.
|
When you receive a payment in a currency you do not hold, PayPal prompts you to open a balance for that currency, convert it to your primary balance, or deny the payment. Payments in currencies for which you hold a balance are applied to the appropriate balance. You see a summary of each currency balance in your Account Overview page.
|
l
|
Yes: Accept the payment regardless of the currency in which the payment is made.
|
|
l
|
Ask Me: Transaction-by-transaction, you can choose to accept or deny a payment in a currency you do not currently hold. If you accept the payment, it becomes a completed transaction. If you deny a particular payment, the sender of the payment is notified that the payment has been denied and is credited with the payment amount. PayPal does not charge fees for denied payments.
|
Because many international addresses cannot be confirmed, you may choose to block payments from users with non-U.S. PayPal accounts in order to qualify for the Seller Protection Policy.
You can choose whether or not to receive payments initiated via the Pay Anyone subtab of the
Send Money tab on the PayPal website. Selecting this option might help you manage your account, because the payments you receive will be associated with a specific item or transaction that you defined.
If you block these payments, you accept only payments initiated from Buy Now, PayPal Shopping Cart, Gift Certificate, Subscription, and Donation buttons, as well as Winning Buyer Notification, Mass Payments, Money Requests, Smart Logos, or eBay Checkout Payments.
You can force people to pay you with a bank account or funds in their PayPal balances if they are able to do so. However, if they cannot pay using a bank account or their PayPal balances, they still have the option to pay with a credit card.
This preference can also help to reduce your risk of chargebacks. Verified members are people who have confirmed their bank accounts with PayPal or who have been otherwise verified by PayPal. Because most Verified members have the option of paying with their bank accounts (via eCheck or Instant Transfer), this preference does not prevent them from sending you money. When they pay with PayPal’s Instant Transfer, you receive the payment instantly, just as when they pay with a credit card. Members who have not confirmed their bank accounts with PayPal can still send you money funded by credit cards.
You can block payments from PayPal members who pay with eChecks. Because eCheck payments take three to four business days to clear, you might want to block them for your Instant Purchase and Buy Now buttons.
If you choose not to block these payments, you can receive eCheck payments through PayPal Website Payments or Auction Logos. eCheck payments are listed as Pending and are not credited to your PayPal account for three to four business days.
When PayPal members pay with credit cards on file with their PayPal accounts, the transactions appear on their credit card statements in the following format in the description:
The value you specified is converted to all upper-case letters, spaces are removed, the result is truncated to eleven characters. The result is stored in your account profile as your Credit Card Statement Name
The default value for your Credit Card Statement Name may be difficult for payers to understand. To reduce chargebacks and payer confusion, replace the default Credit Card Statement Name with one that accurately reflects your business or legal name.
The My Account Overview page appears.
The Profile Summary page appears.
|
3.
|
In the Selling Preferences column, click the Payment Receiving Preferences link.
|
The Payment Receiving Preferences page appears.
Websites that use PayPal in different parts of the world work with different languages and different character encoding schemes. PayPal refers collectively to these differences as
language encoding.You can set the default language encoding that your website uses to exchange data with PayPal. The default settings are used for all transactions sent from your website to PayPal and all automated notifications sent from PayPal to your website. You can override the default settings on individual transactions with the
charset HTML Form variable.
A character set is a defined set of individual letters and symbols used in a particular language. For instance, the ASCII character is commonly used to define the character in written American English. The Big 5 character is commonly used to define the characters in written Chinese.
Character encoding is the way a computer system represents internally the letters and symbols of a particular character set. Computers use internal representation to store, transmit, and process data.
Different character encoding schemes define the number of bytes each character requires and the pattern of on/off bits that identify a particular character. For example, single-byte encoding schemes, such as ANSI and extended ASCII, allocate one byte for each character or symbol in character set for Western European languages. Other encoding schemes, such as Unicode and UTF-8, allocate several bytes for each character in their character sets.
Your Language Encoding preferences let you can control which language and encoding scheme is used to exchange data between your website and PayPal. When you sign up for a PayPal account, the system determines your default language and encoding based on your country of origin. For example, if you sign up with a French postal address, your language and encoding are set for Western European languages.
You must set your language encoding preferences to match the language and encoding that your website uses. Otherwise, data cannot be exchanged with PayPal. Generally, the default selected by PayPal is appropriate. In some cases, particularly in Asian countries or with certain operating systems, the language and/or encoding may not match those used by your website.
|
l
|
Encoding: the character encoding used on your website, such as UTF-8, EUC-JP, or KOI8‑R.
|
The My Account Overview page appears.
The Profile Summary page appears.
|
3.
|
In the Selling Preferences column, click the Language Encoding link.
|
The Language Encoding page appears, as shown below.
|
4.
|
From the Your website’s language dropdown menu, select an appropriate setting.
|
Sometimes setting your website’s language is insufficient to set the language encoding correctly. You may need to specify the character encoding explicitly. In addition, you may need to select separately the encoding for data that your website sends to PayPal with Website Payments Standard buttons and the data sent by PayPal through IPN, downloadable logs, and email notifications.
The My Account Overview page appears.
The Profile Summary page appears.
|
3.
|
In the Selling Preferences column, click the Language Encoding link.
|
The More Encoding Options page appears, as shown below
|
6.
|
From the Encoding dropdown menu, select the appropriate character encoding scheme for data that your website sends to PayPal.
|
|
7.
|
Click the Save button to preserve both the encoding options that you selected on this page and the website language you selected on the previous page.
|
|
IMPORTANT:
|
You can click the Cancel button to return to the previous page and review your choice for website language. However, selections that you made on the More Encoding Options page are lost.
|
If you have a PayPal business account, you can set up multiple logins with different permissions to allow multiple people in your organization to access your PayPal account. Multi-user access lets you give different employees access to different parts of your account, based on their business functions.
For example, you can give your customer service representatives their own logins with limited privileges that let them only view balances and make refunds but not let them edit profiles, send money, or withdraw funds.
The My Account Overview page appears.
The Profile Summary page appears.
|
3.
|
In the Account Information column, click the Multi-User Access link.
|
The Multi-User Access-Current Users page appears.
|
4.
|
Click the Add User button if you have not added users yet, or the Add button if already have additional users on your account.
|
The Add Users page appears.
The My Account Overview page appears.
The Profile Summary page appears.
|
3.
|
In the Account Information column, click the Multi-User Access link.
|
The Multi-User Access - Current Users page appears, as shown below:
The Change Multi-User Access page appears, with the
User Name and
User ID displayed as read-only text.
The My Account Overview page appears.
The Profile Summary page appears.
|
3.
|
In the Account Information column, click the Multi-User Access link.
|
The Multi-User Access - Current Users page appears.
The Change User Password page appears, with the
User Name and
User ID displayed as read-only text.
The My Account Overview page appears.
The Profile Summary page appears.
|
3.
|
In the Account Information column, click the Multi-User Access link.
|
The Multi-User Access-Current Users page appears.
The Remove User page appears, with the
User Name and
User ID displayed as read-only text.
|
5.
|
Click the Remove button to permanently remove the user login from your account, or click the Cancel button to retain the user login.
|
Use the Currency Balances section of your account profile to manage your currency balances, including:
When people make payments in currencies that you hold, the funds appear in your account in the balance of that currency. When people make payments in currencies that you do not hold, you can accept or deny the payments.