Instant Payment Notification (IPN) allows you to integrate PayPal payments with your website’s back-end operations. IPN provides immediate notification and confirmation of PayPal payments you receive.
|
2.
|
PayPal POSTs FORM variables to a URL you specify that runs a program to process the variables.
|
|
2.
|
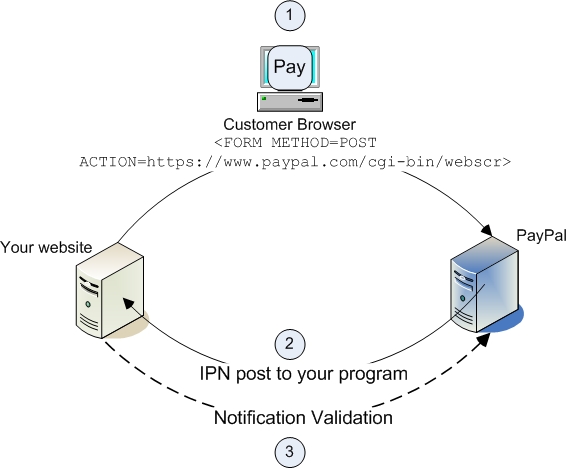
PayPal posts HTML FORM variables to a program at a URL you specify. You can specify this URL either in your Profile or with the notify_url variable on each transaction. This post is the heart of IPN. Included in the notification is the customer’s payment information (such as customer name, payment amount). All possible variables in IPN posts are detailed in . When your server receives a notification, it must process the incoming data.
|
You can activate IPN for your PayPal account through your account profile. Separately, you can activate IPN for specific payments by including a notification URL in the programming code that your website sends to PayPal when people pay you.
When you activate IPN through your account profile, the notification URL that you specify is used for all your IPNs, You can override the value on specific payment transactions by including notification URLs in the programming code that your website sends to PayPal when people pay you.
|
3.
|
In the Selling Preferences column, click the Instant Payment Notification Preferences link.
|
|
6.
|
In the Notification URL text box, enter the URL of the program that will receive and process IPNs
|
You can activate IPN for specific payments by including a notification URL in the programming code that your website sends to PayPal when people pay you. PayPal sends only IPNs related to payments that result from the code. PayPal sends them to the URL that you specified in the code.
For example, if you accept payments from different websites through one PayPal account, you could include different notification URLs in your programming code to let each website receive IPNs only for its own payments.
After your server receives an Instant Payment Notification, you must confirm that the notification is authentic. This is known as
notification validation. Performing notification validation for all the IPNs that you receive helps you and PayPal prevent the kind of fraud that results from spoofing, or “man-in-the-middle” attacks.
|
–
|
You are not using a shared website hosting service.
|
|
–
|
You use the notify_url variable on each individual payment transaction.
|
You can use shared secrets for IPN notification validation by including them in the programming code that your website sends to PayPal when people pay you. As an alternative, can set a shared secret in your account profile.
When your IPN-processing program receives an IPN, it must compare that the shared secret in the post from PayPal matches the shared secret that you expect for notifications about that payment. If the secret posted by PayPal does not match the secret that you expect, flag the IPN for further investigation.
If you use shared secrets for IPN notification validation, PayPal recommends that you include shared secrets in all the programming code that your website sends to PayPal when people pay you. Add a shared secret variable and value to the value of the notification URL that you include in your programming code.
yourIPNNotificationURL is the URL where you receive IPNs.
shared_secret_variable_name is any variable name that you want.
shared_secret_value is the shared secret itself.
If you want to use the same shared secret for notification verification of all IPNs, you can set the secret in your account profile. PayPal includes the secret you set in all IPNs, except for payments that result from programming code in which you include shared secrets with the notification URL variable.
Shared secrets posted to you by PayPal through IPN are not encrypted; they are in clear text for easier processing. Therefore, the shared secrets are recorded in the clear in the access logs of your web server. Be sure to practice proper security for these logs. If you use a web server hosting service, ensure that your provider practices proper security of your data.
If you cannot use shared secrets for notification validation, you can use postbacks to PayPal, instead. Your postback must include exactly the same variables and values that you receive in the IPN posted to your server by PayPal, and they must be in the same order.
When you receive a VERIFIED postback response, perform the following checks on data in the IPN:
|
2.
|
If the payment_status is Completed, check the txn_id against the previous PayPal transaction that you processed to ensure it is not a duplicate.
|
|
3.
|
Check that the receiver_email is an email address registered in your PayPal account.
|
After you complete the above checks, notification validation is complete. You can update your database with the information provided, and you can initiate other appropriate automated back-end processing.
When you receive an INVALID postback response, you should investigate. In some cases, these responses result from an IPN error, possibly from a change in the IPN format.
To determine if an INVALID response results from an IPN error, first examine your code. Your postback must include exactly the same variables and values that you receive in the IPN posted to your server by PayPal, and they must be in the same order.
With multiple currencies, you can accept payments in any of the PayPal-supported currencies (see
“PayPal-Supported Transactional Currencies”). As a result, your IPN notifications will then include information about the currency of the payment. The following overview explains how IPN interacts with multiple currencies.
These variables reflect the amount received and corresponding fee of U.S. Dollar (USD) payments. If the amount received and fee deducted are in a currency other than USD, the variables will still appear in your IPN, but will have no values in them.
|
Note:
|
payment_fee is not always present in IPNs, such as when a payment is pending.
|
These values are absent for non-USD payments so that IPN scripts will not process these amounts as USD. However, legacy IPN scripts will continue to work as before as long as the merchant only receives USD payments.
IPN notifications that use the payment_gross variable will have the following multi-currency variables added. The variables
mc_gross and
mc_fee will not be added to IPN notifications with
txn_type:
subscr_signup,
subscr_cancel,
subscr_modify,
subscr_failed, or
subscr_eot.
|
l
|
mc_gross: Full amount of payment received, before transaction fee.
|
|
l
|
mc_fee: Transaction fee associated with the payment. Variable function like payment_fee variable (variable does not appear when payment pending, and so on).
|
|
l
|
mc_currency: Currency of mc_gross, mc_fee, payment_gross, and payment_fee amounts. Possible values are detailed in “”.
|
If the account is set to automatically convert payments, these variables will be used to show the conversion. This example is for a user with a USD balance who receives a payment of 100 GBP:
Buyers can register claims about payments; such claims are called cases. PayPal notifies merchants about new cases with email and with IPN.
The IPN messages for chargebacks resulting from a complaint are asynchronous: the IPN message for the chargeback can be sent to the merchant before the IPN message relating to the complaint. You should compare the IPN variable parent_txn_id of all IPN messages to match the chargeback with the complaint.
The Downloadable Dispute Report provides details about newly created disputes and changes in the status of cases already in mid-process. The report is designed for the merchant that processes payment volumes better handled by programmatic interfaces. Thus, while the report resembles the Dispute Report available via the Resolution Center on the PayPal site, the downloadable is different in that it contains all open records (records cannot be filtered) and the invoice ID, which can use to track dispute cases based on your transaction identifiers.
The report is generated every day based on activity for the previous day. Days in which no activity occurred create an empty report. Reports are available for seven days, after which the report is no longer available
The report contains information about all chargebacks and buyer complaints for your account. This report does not contain information about ACH returns of PayPal-unauthorized complaints.
Use this report as a starting point against which you will compare all future reports. If you want this “first report” re-run, contact your PayPal Account Manager and ask them to generate a “first day” DDR report.
Reports generated every day following the First DDR report contain information about dispute activity for your account in the past 24 hours or since the last report was generated, including the following:
You can automate which details you want to be prioritized in your dispute reports by assigning values shown in the sample HTML below. You can set the values for day, month, and year. The uname value is the alias you created with the Multi-User Access feature.
You will receive an email informing you that the report is ready. Be sure to monitor your primary email address for an email stating the download report is ready. This email contains a hyperlink to the report, which can you access with a browser. You can also use the email as a trigger for your script that programmatically retrieves the report.